Building and Running CESM
Recently I applied for a job where one requirement is to have experience with the Community Earth System Model (CESM). Therefore, this post is about how to build and run the publicly available CESM under Mac OS X. It is fairly straightforward but you need to pay some attention because Earth System Models are naturally complex and complicated software frameworks. Here are the steps to run CESM on your Mac.
- Register at the CESM website to obtain credentials for the source code download.
- Checkout the latest release (or whatever version you prefer) from the CESM SVN server.
- Prepare and build a custom setup following the instructions by Walter Hannah.
- Run the CESM model
Checkout CESM source code from SVN repository
svn co --username guestuser https://svn-ccsm-models.cgd.ucar.edu/cesm1/release_tags/cesm1_2_2 cesm1_2_2
Configure your machine, compiler, and library settings
You have to tell the CESM setup framework that you would like to use the GNU compiler, the NetCDF and the Parallel-NetCDF libraries for your “undefined” Mac OS X machine. Therefore, edit ccsm_utils/Machines/config_compilers.xml:
<compiler MACH="userdefined">
  <ADD_FFLAGS> -fno-range-check -fcray-pointer -arch x86_64 </ADD_FFLAGS>
  <NETCDF_PATH>/usr/local/Cellar/netcdf/4.3.3.1_4</NETCDF_PATH>
  <PNETCDF_PATH>/usr/local/Cellar/parallel-netcdf/1.7.0</PNETCDF_PATH>
  <ADD_SLIBS>$(shell $(NETCDF_PATH)/bin/nc-config --flibs)</ADD_SLIBS>
  <ADD_CPPDEFS></ADD_CPPDEFS>
  <CONFIG_ARGS></CONFIG_ARGS>
  <ESMF_LIBDIR></ESMF_LIBDIR>
  <MPI_LIB_NAME></MPI_LIB_NAME>
  <MPI_PATH></MPI_PATH>
</compiler>
Create a CESM setup
Now you are ready to create a new CESM setup I choose to run an Aquaplanet simulation in CAM5 hoping that this will not take too long to complete. In cesm1_2_2/scripts type
./create_newcase -case <your case> -res T31_g37 -compset 2000_CAM5_SLND_SICE_AQUAP_SROF_SGLC_SWAV -mach userdefined
Other configurations, i.e., the compset, can be found on the CESM website. Next, adjust the XML configuration files in cesm1_2_2/scripts/<your_case> where <your_case> is the name of the CESM setup you created before
./xmlchange -file env_build.xml -id GMAKE_J -val 8
./xmlchange -file env_build.xml -id GMAKE -val make
./xmlchange -file env_build.xml -id OS -val darwin
./xmlchange -file env_build.xml -id MPILIB -val mpich
./xmlchange -file env_build.xml -id COMPILER -val gnu
./xmlchange -file env_build.xml -id CESMSCRATCHROOT -val ~/Projects/cesm1_2_2
./xmlchange -file env_build.xml -id EXEROOT -val ~/Projects/cesm/my_model/bld
and for the build environment
mkdir -p ~/Projects/cesm/my_model
mkdir -p ~/Projects/cesm/input
./xmlchange -file env_run.xml -id RUNDIR -val ~/Projects/cesm/my_model/run
./xmlchange -file env_run.xml -id DIN_LOC_ROOT -val ~/Projects/cesm/input
and to change the default number (64) of used CPUs to 2:
./xmlchange -file env_mach_pes.xml -id MAX_TASKS_PER_NODE -val 1
./xmlchange -file env_mach_pes.xml -id NTASKS_ATM -val 2
./xmlchange -file env_mach_pes.xml -id NTASKS_LND -val 2
./xmlchange -file env_mach_pes.xml -id NTASKS_ICE -val 2
./xmlchange -file env_mach_pes.xml -id NTASKS_OCN -val 2
./xmlchange -file env_mach_pes.xml -id NTASKS_CPL -val 2
./xmlchange -file env_mach_pes.xml -id NTASKS_GLC -val 2
./xmlchange -file env_mach_pes.xml -id NTASKS_ROF -val 2
./xmlchange -file env_mach_pes.xml -id NTASKS_WAV -val 2
./xmlchange -file env_mach_pes.xml -id TOTALPES -val 2
These changes are processed via ./cesm_setup and now you can start the build process in <your case>/
./<your case>.build
Run your CESM model
Finally, you need to uncomment one of those two lines in <your case>.run
#mpiexec -n 2 $EXEROOT/cesm.exe >&! cesm.log.$LID
#mpirun -np 2 $EXEROOT/cesm.exe >&! cesm.log.$LID
Now, you can run your CESM setup on your Mac OS X
./<your case>.run
and, hopefully, after a while your console prints out something like this:
-------------------------------------------------------------------------
 CESM BUILDNML SCRIPT STARTING
 - To prestage restarts, untar a restart.tar file into ~/Projects/cesm/my_model/run
 infile is ~/Projects/cesm1_2_2/scripts/<your case>/Buildconf/cplconf/cesm_namelist
CAM writing dry deposition namelist to drv_flds_in
CAM writing namelist to atm_in
 CESM BUILDNML SCRIPT HAS FINISHED SUCCESSFULLY
-------------------------------------------------------------------------
-------------------------------------------------------------------------
 CESM PRESTAGE SCRIPT STARTING
 - Case input data directory, DIN_LOC_ROOT, is ~/Projects/cesm/input
 - Checking the existence of input datasets in DIN_LOC_ROOT
 CESM PRESTAGE SCRIPT HAS FINISHED SUCCESSFULLY
-------------------------------------------------------------------------
Thu Mar 24 12:02:31 CET 2016 -- CSM EXECUTION BEGINS HERE
Thu Mar 24 12:24:58 CET 2016 -- CSM EXECUTION HAS FINISHED
(seq_mct_drv): ===============       SUCCESSFUL TERMINATION OF CPL7-CCSM ===============
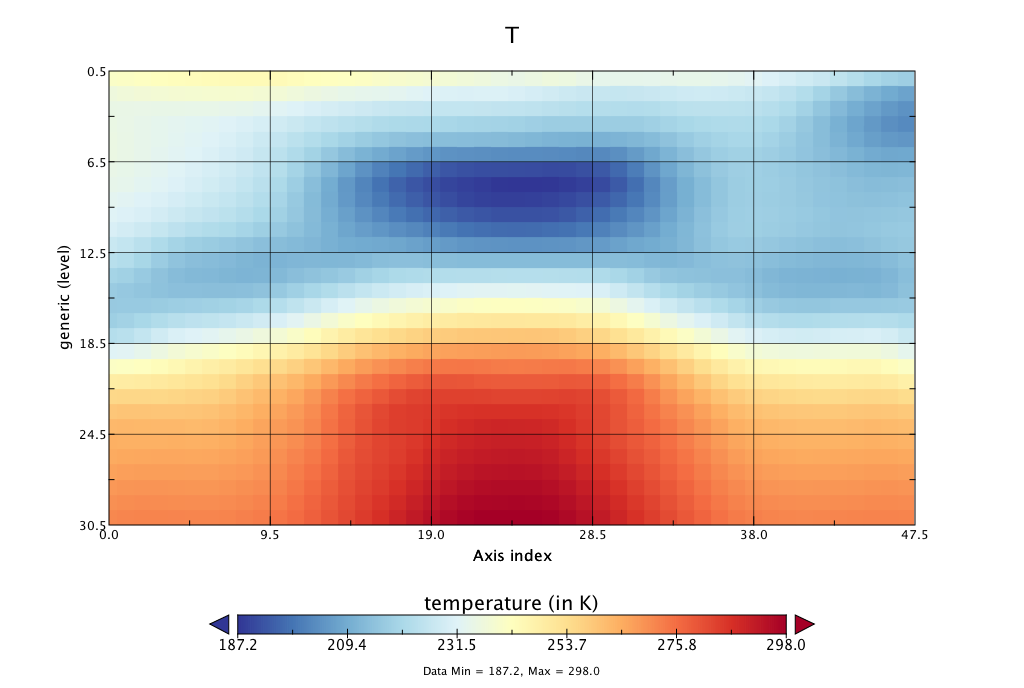
Here’s the zonal mean of the air temperature. I didn’t pay too much attention to the axis descriptions but I hope you acknowledge this as a result ;)
Tips and Tricks and Errors
- To make the parallel-netcdf library available to everybody using
homebrewfor Mac OS X I already created a PR on Github. - During the SVN checkout the MCT directory in
models/utilswas not updated. You can do so manually by enteringgit clone https://github.com/MCSclimate/MCT.git mctinmodels/utils. - Replace
isnanfwithisnaninshr_isnan.cas described here; other potential errors during that process are listed, explained and resolved here.